Loan-Level Actions and Workflows
Action Menu on the Loan
Each loan has a floating Action Bar on the right. These actions let the user perform specific operations on the loan. To control any inconsistencies and discrepancies in the system behavior, we show appropriate message/warnings on the UI. At a few places, we have also put some UI validations which are described as UI Validations section against each of the action menu.
Disclaimer: Please note that you may not see all these actions in the LMS portal since we would have disabled a few as per the discussions during discovery.
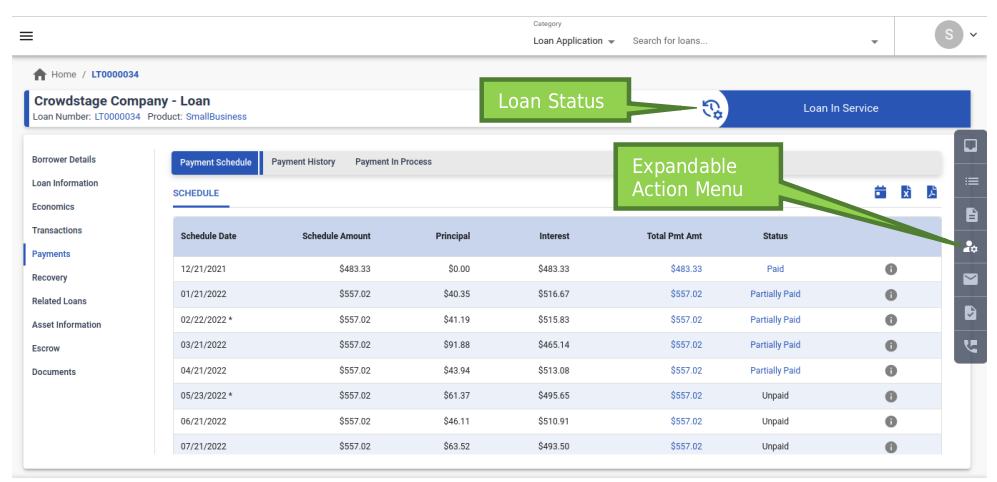
Action Menus
On the loan view, on the right side, we see , which on click, expands into a list of actions that the user can perform on loan. All actions are not viewable for all users. These are configured at a role level during the initial set-up for each tenant. Details of the Action Menus are given below.
Send Email
On the Action Bar, we see


,on click, allows the user to send an email to the borrower
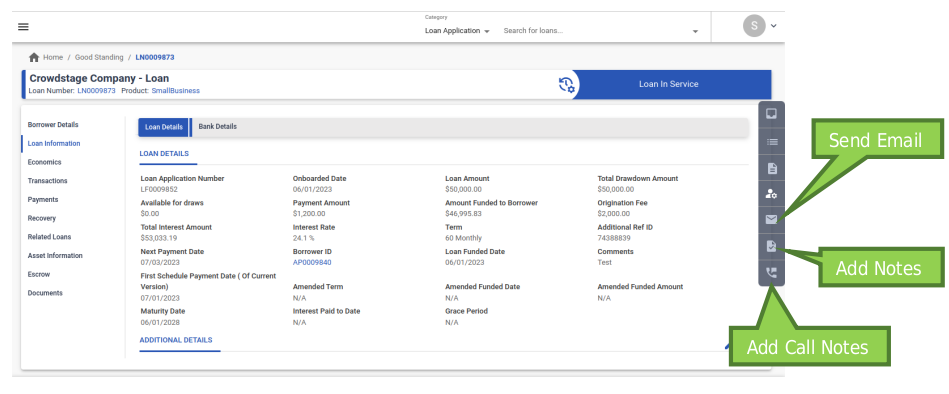
Add Call Notes
Allows the user to add the details of any calls to the client and also setup a follow up
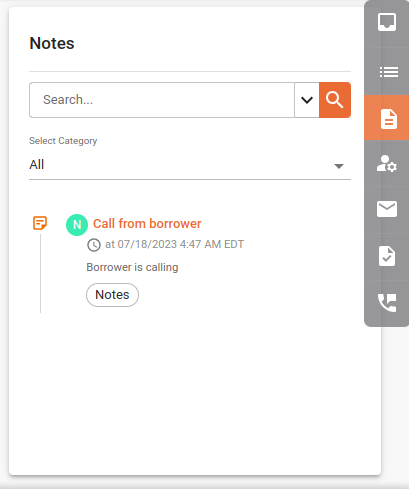
Add Notes
Allows users to add categorized notes on the loan for future reference
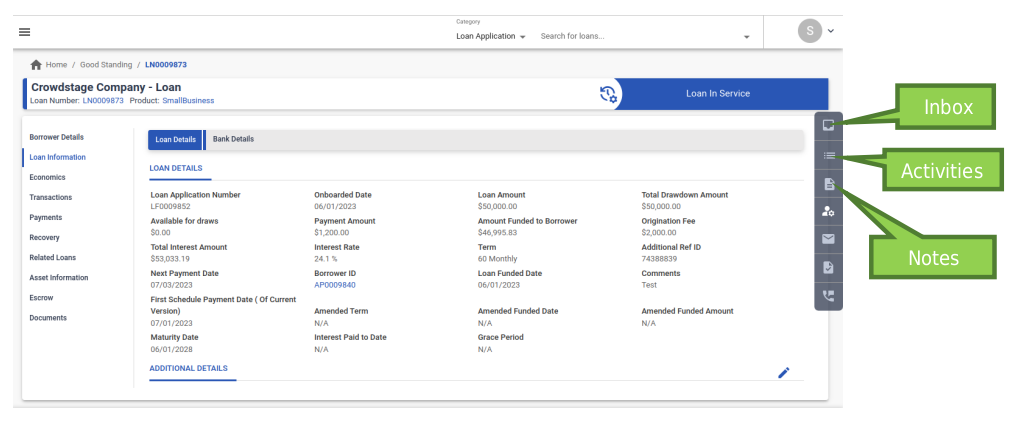
Inbox
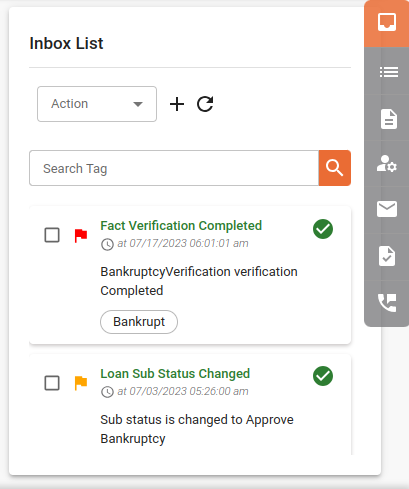
This highlights the important events happening on this loan and shows as flags. These flags can be acknowledged/dismissed. These flags which appear here are configurable by the tenant. The user can add flags manually as well.
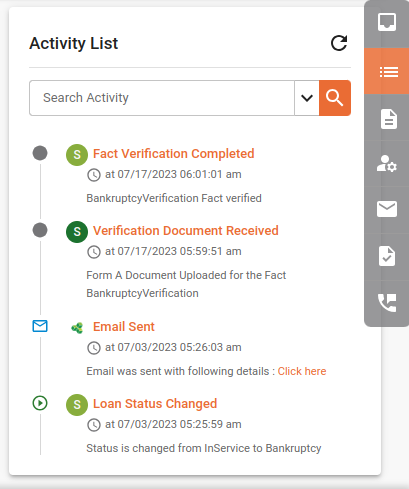
Activities
This captures the complete audit trail of the loan since inception till the end of the loan lifecycle. This shows the summary of the event with a timestamp and also the user who performed the action. If an event is triggered by the system, then it will show “System” in the UserName.
Notes -This shows all the “Notes” that were added to this loan using the Add Note action explained above. The user can search notes using “Category”.
Inbox:
Activity List
Notes
Update Payment Instrument/Bank Details
Provides an ability to add a new auto-pay instrument or update the existing one. Once submitted, this will be available in the “Loan Information” -> “Bank Details” tab.
- If the user wants to add a new instrument for payments, he can select “Add New Instrument” in the “Select Account” field, and he will be prompted to select the “Payment Instrument” field from the configured instruments and fill in related fields pertaining to that instrument. He may choose to make this as an “active” one so that this is used for auto-payments.
- If the user wants to update the values of any of the existing payment instruments, he can select that instrument from the dropdown in the “Select Account” field and update the required value(s). Debit cards cannot be added or edited using this action, there is a separate action “Add Card Details” for the same.
Note:
The instrument details, if verified from the LOS, will not be allowed for editing in LMS. The “isVerified” flag in the onboarding API will let LMS know of this.
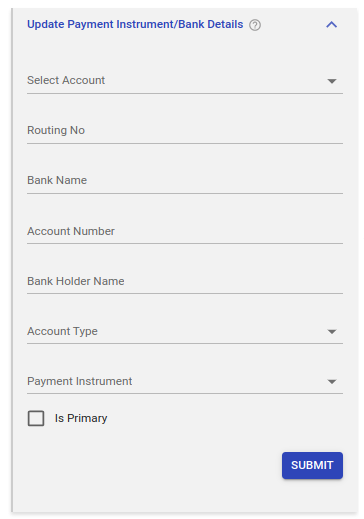
Fields available in Update Bank Details:
- Select Account
- Routing Number
- Bank Name
- Account Number
- Bank Holder Name
- Account Type
- Payment Instrument
- Is Primary
If it is added as a primary account, it will have a check mark in the Loan Details tab. This action can also be used to switch to a different primary account, where there are more than 2 accounts listed. An account that is marked as primary will be used for creation of payment instructions by the system.
Add Card Details
Provides an ability to add a new debit card instrument. Once authorized, the last 4 digits of this card will be listed in the “Loan Details” tab as a primary instrument, event will get logged in activity, whether successful or not. However, if authorization fails, then there will be no max attempts and we will show a message from the chosen payment processing 3rd party, subject to any limits from such a provider. In order to authorize the following fields are required from the action screen:
-
Card Holder Name: Mandatory, Type = String; min length = 1
-
Debit Card Number: Type = String; minLength = 13; maxLength = 25
-
Expiration: Type = String; minLength = 4; maxLength = 4
-
CVV/CVV2:Type = String; minLength = N/A; maxLength = 4
-
Type of Debit: String; minLength = 2, ; maxLength = 2
Description in UI Value sent in API
Mastercard MC
Visa VI
American Express AX
Discover DI -
Zip Code: Type = String; minLength = N/A; maxLength = 20, operationally max length=10
Make Payment
Provides an ability to record a past payment AND/OR initiate an ACH/Debit Card in the future towards a loan.
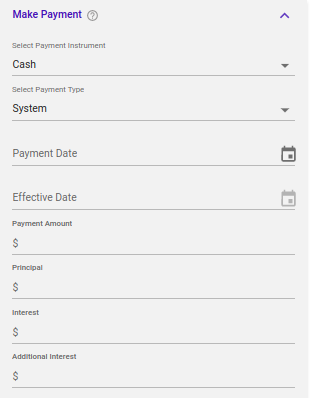
Purpose: This action allows a back-office user to initiate a payment recording manually. Typically, when ACH/Debit card transactions are to be initiated on a regular basis, manual intervention is not needed. The system knows the payment dates and will initiate the payments as per current active repayment schedule.
Fields available in Make Payment action if the payment instrument is Cash.
- Select Payment Instrument - this will be a dropdown of configured instruments
- Select Payment Type - this will be a dropdown of configured payment hierarchies. You may choose how to allocate the money from this payment. Each of these options would have been configured at the time of tenant set-up, details are available in the LMS discovery document.
- Payment Date - Date of recording the payment
- Effective Date - Date for which the payment needs to be recorded(used in backdating payments)
- Payment Amount
- Principal
- Interest
- Additional Interest
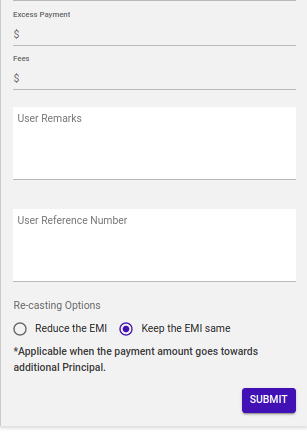
- Excess Payment
- Fees Incl. Tax as applicable
- User Remarks
- User Reference Number
- Recasting Options - explained in the below section
- Reduce the Payment
- Keep the Payment same
Additional Fields pertaining to a specific instrument(Check/ACH/Debit Card) are available in Make Payment action upon selection of that instrument. The following are some of the additional fields that you may see:
- Bank Account Number (dropdown, not editable)
- Bank Account Type (dropdown, not editable)
- Routing Number (dropdown, not editable)
- Borrower’s Name (dropdown, not editable)
- Check Number
Re-casting (in fixed payment type loans)
In LMS, any payment amount is apportioned according to the hierarchy chosen while making the payment. This hierarchy is one of the configured hierarchies for the tenant. Each hierarchy has different buckets defined in a specific order. In some of the hierarchies, one of the buckets is that of the “Additional Principal”. This is the principal which is over and above the due schedule principal. The amount goes into this bucket if all the previous buckets in that hierarchy are fulfilled. This results in re-amortization of the payment schedule, because the additional principal payment changes the principal outstanding on the loan and also the split of P and I in the future schedules. In LMS, this is known as re-casting where a new payment schedule is created with a different version. If there is any accrued and unpaid interest(prior interest) before the payment was made, it is added in the interest component of the first schedule in the recasted schedule.
Note:
In cases where this prior interest is very high, higher than the payment amount, then the system automatically creates interest-only schedules(capped at the payment amount) to recover this prior interest first and then moves on to creating P + I schedules.
The user can choose one of the below two recasting options shown on the Make Payment action screen and also available in the Make Payment API.
- Reduce the Payment: Choose this option when you want the system to re-calculate the payment amount based on the reduced principal balance. This doesn’t have any impact on the maturity date of the loan.
- Keep the Payment same: Choose this option when you want the system to generate the new schedule on the same installment amount and let the system re adjust the term accordingly. This may change the maturity date of the loan depending on the payment amount value.
UI Validations
| Field Name | Validation/Restriction | Configurable per tenant/Product | Remarks |
|---|---|---|---|
| Payment Date | should be>= Funded Date For DebitCards >=max of (Funded Date, Today, Considered Funded date, Current date + pmt processing days, Tenant timezone | Product | |
| Effective Date | should be >= Funded Date and <= Payment Date. NA For DebitCards Can be hidden based on values given in “HideEffectiveDateOnPaymentInstrumetType” | Product Configurable per tenant as per the auto-pay instrument(s) for that tenant. | We don't allow backdated payments using ACH/EFT instrument |
| Pay-off Discount | visible when Payment Purpose = Payoff and editable when Total o/s > Payment Amount | Configurable per tenant | |
| Principal, Interest, Additional Interest, Prior Interest, Excess Payment, fees | editable when Payment Purpose = Custom | ||
Recasting Options:
| visible for Installment type loans only Can be hidden based on values given in “HideRecastingOptionsForPaymentType” | Configurable per tenant as per the configured hierarchies for that tenant where the Additional Principal bucket is not there. |
Make Borrower Payment
“Make Borrower Payment” action provides users the ability to make ACH/Non-ACH payments across all loans of the borrower in a given portfolio in FIFO order.
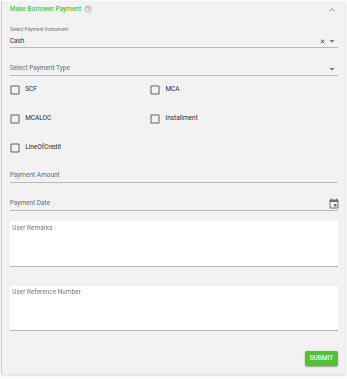
Fields available in Make Borrower Payment action:
- Select Payment Instrument
- Select Payment Type
- Select Portfolio
- Payment Amount
- Payment Date
- User Remarks
- User Reference Number
Steps:
- Choose from 3 payment methods – Cash, Check or ACH, more methods can be setup based on tenant
- Choose how to allocate the money from this payment - This is identical to the setup in “Make Payment” Action as described above
- System: Based on the default payment hierarchy set up for the product. For example: for an Accrual loan, it can be Interest first, any surplus then gets applied to the Principal. You can also choose to bring fees in to the hierarchy
- Schedule: Use this option to schedule an ACH in the future manually, typically out of schedule repayment requests can be accommodated. Or this option can also be used to apply a check payment after it has been received and treat it as if it’s a payment per schedule. Typically, if you receive a check a day before or a day later, or if its’ an MCA loan, you can choose this option
- Principal Only: Apply all funds to Principal only: Apply all funds to Total outstanding
- Payoff: To pay all outstanding balances. If outstanding balances need to be reduced, then use charge-off action or reverse fees from Transactions tab first, and then use this option.
- Custom: Use this option to allocate payment in a way that is not captured in any of the options above.
- Select a portfolio. Once the portfolio is selected, the borrower payment will be under the selected portfolio.
- Enter the payment amount
- Choose a payment date (past or future, can be configured to restrict the allowable time frame).
- Enter user remarks and User reference number.
Pause/Resume Payment
Provides an ability to manually pause automatic ACH creation for loan repayments. Once a pause has been put in place, future ACH creation will be disabled for that loan, until the pause has been resumed.
It can also be used to resume payments, in cases there is an existing Pause on Payments on a Loan.
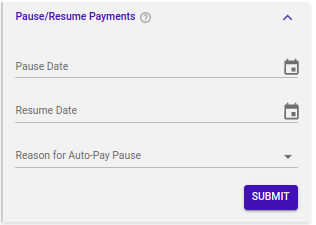
Option: User needs to enter the date on which he wants to Pause or Resume payments.
ACH which are already created and submitted cannot be changed using this action.
Validations: For Payment Pause the date selected will be equal to or later than (As-of-date + (payment Processing Days) + 2).
As of date is the date when the last accrual was run, typically current date minus 1, and is always a past date. If accrual has been paused, as of date will be a much older date. Payment Processing Days, the exact value for this is available in the LMS discovery file shared with you, sheet name “Product Parameters”, field name “PAYMENT PROCESSDAYS”. If it is difficult to obtain, please ask your LF representative to share the most recent processing days configuration.
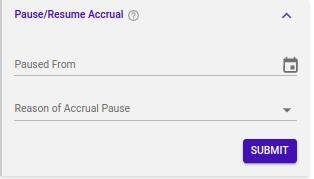
Pause/Resume Accrual
This allows the user to pause Accrual on a loan. This stops additional interest accruing on the loan. The accrual will restart automatically if a payment is made.
Apply Fee/Charge
Provides an ability to manually assess fees / penalty / Charge.
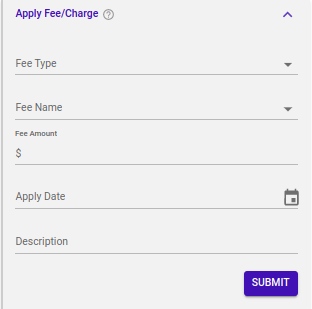
Fields available in Apply Fee/Charge action:
- Fee Type
- Fee Name
- Fee Amount
- Apply Date
- Description
Steps:
- Select Fee Type. Available options are
- Scheduled - choosing this will mean that the system needs to create an ACH for this fee along with the
- scheduled payments
- Per Occurrence
- Pre Applied
- Select Fee Name
- Enter Fee Amount
- Select Apply Date
- Enter Description
UI Validations
| Field Name | Validation/Restriction | Configurable per tenant/Product |
|---|---|---|
| Start Date/End Date | Min Check(if Fee Type = Scheduled) As of Date + 2+ Payment Processing Day | Product |
Estimate Pay-Off
Provides an ability to calculate the estimated pay-off amount on a specific future date.
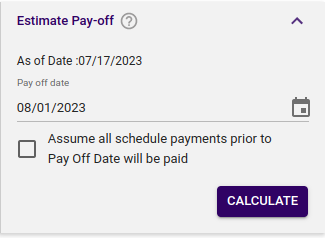
Fields available in Estimate Pay-off action:
- Pay off date
- Assume Schedule payments will be paid (check box)
- If the system needs to consider all intermittent payments between the two dates (“As of date” and “Payoff date”) as successfully received.
UI Validations
| Field Name | Validation/Restriction | Configurable per tenant/Product | Remarks |
|---|---|---|---|
| Pay Off Date | Min Check As of Date + 2+ Payment Processing Day | Product |
Add Collection Details
“Collection Details” option provides the ability for the user to update the borrower's personal and collection details.
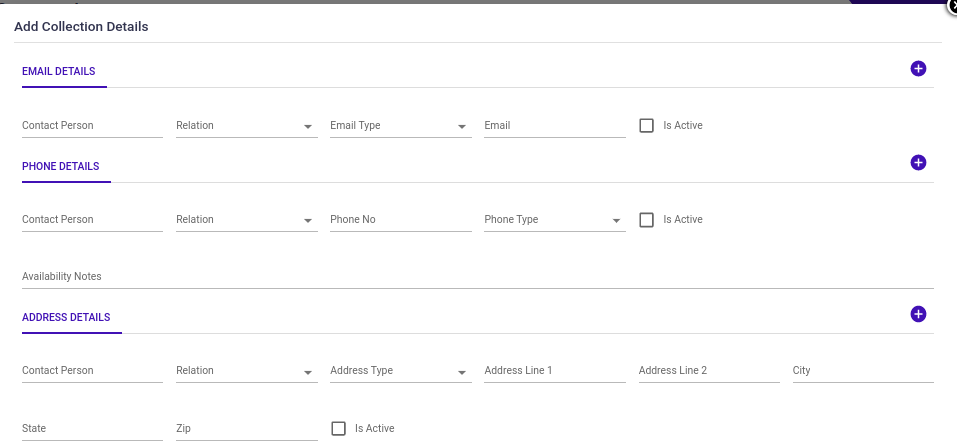
Steps:
- User can update email details of the borrower or an alternate contact
- Contact Person
- Relation (can be selected one option from available options)
- Email Type (can be selected one option from available options)
- Is Active (if selected, the email address is considered as active)
- User can update phone details of the borrower or an alternate contact
- Contact Person
- Relation (can be selected one option from available options)
- Phone Type (can be selected one option from available options)
- Phone
- Is Active (if selected, the phone is considered as active)
- User can update Address details of the borrower or an alternate contact
- Contact Person
- Relation (can be selected one option from available options)
- Address Type (can be selected one option from available options)
- Address 1, Address 2, City, State and ZIP can be entered
- Is Active (if selected, the address is considered as active)
- User can update collection details
- Evaluation – Evaluation reason can be selected one option from available options
- Facts – can be selected one option from available options
- Reason for Non-Payment – One Non-Payment reason can be selected from a dropdown list of options.
- Situation – can be selected one option from available options.
- Once submitted, the collection details for the borrower will be updated and visible in Recovery > Modifications/Collections tab
Upload Docs
Provides an ability to upload documents. Documents uploaded are available in the Documents tab of Loan View. This action is also contextually available, when any sub-process such as Bankruptcy or SCRA proceedings are being initiated and are made subject to verification of documents.

Users can upload additional documents like Photo ID / Bank Statement / Passport etc..
Re-structure Payments
During delinquency or any other reason, if the lender wishes to tweak the payment amount, tenure, or payment frequency as per the agreement with the borrower, it can do so with this action.
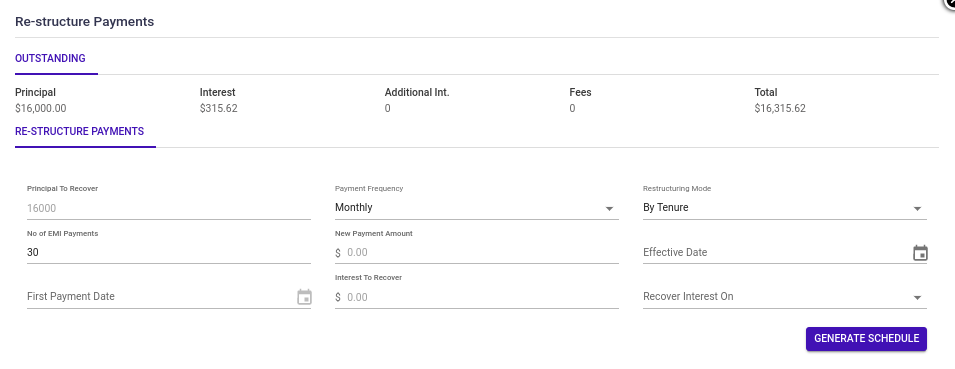
The outstanding details are shown in the “Outstanding” section at the top.
Principal to recover: This is principal o/s from the last copied* schedule(check Notes below, point 5). This cannot be edited.
Payment Frequency: The lender can change the frequency of payments using this.
Restructuring Mode: By Tenure or By Payment Amount. If the user selects “By Tenure”, then “No of EMI Payments” will have to be entered and “New Payment Amount” will be auto-calculated. If the user selects “By Payment Amount”, then he will have to enter the “New Payment Amount” field and “No of EMI Payments” will be auto-calculated. P+ I Installment type loans have both of these variants but MCA type has only one variant “By Tenure”.
Effective Date: The new restructured schedule will be effective from this date.
First Payment Date: The first due date of the restructured schedule.
Interest to Recover: Unpaid accrued interest from current “As of Date” to the “Effective Date”.
Recover Interest On: This option provides a dropdown of values configured for you which would tell you how the Interest to Recover would be adjusted in the new schedule.
Notes:
- The restructured schedule is automatically activated on Effective Date
- A new schedule version is created on the Payment Schedule tab.
- Modification/Collections top tab on the loan view page is also updated.
- Payments are paused/resume as per below
- For MCA product
- Paused On: Date of restructuring.
- Resumed On: Effective date + payment processing days.
- For Term loans, if Effective Date -Last carried fwd schedule date > payment processing days parameter, then auto-pay pause/resume will work as below. If this condition is not met, then auto-pay will remain ON.
- Paused On: from (Effective date -payment processing day parameter) to schedule activation date
- Resumed On: Effective date + processing day parameter(only business days to be considered)
- *Older unpaid/partially paid schedules are carried forward to the new schedule
- DPD and current outstanding information is also carried forward so that when the payments are made, the DPD can be adjusted properly against the copied schedules.
UI Validations
| Field Name | Validation/Restriction | Configurable per tenant/Product | Remarks |
|---|---|---|---|
| NA | Product | ||
| Second Payment Date | visible and mandatory when Payment Frequency = Semi-Monthly Max Check: | Product Product | |
| New Payment Amount | visible when "Restructuring Mode" is "By Payment Amount" | Product | |
| No of Payments | visible when "Restructuring Mode" is "By Tenure" | Product | |
| Effective Date | Min Check Max Check(For P+I loans only) For all other frequencies: | Product | |
| First Payment Date | Min Check Max Check(For P+I loans only) Effective Date + adding days based on frequency ("daily":16; "weekly":7;"biweekly":14;"monthly":28;"semimonthly":15;"quarterly":121;"semiyearly":181;"yearly":366) | ||
Modify Loan
“Modify Loan” action provides the user the ability to modify the loan and generate a new loan schedule. The lender can almost edit everything here as per the agreed terms with the borrower.
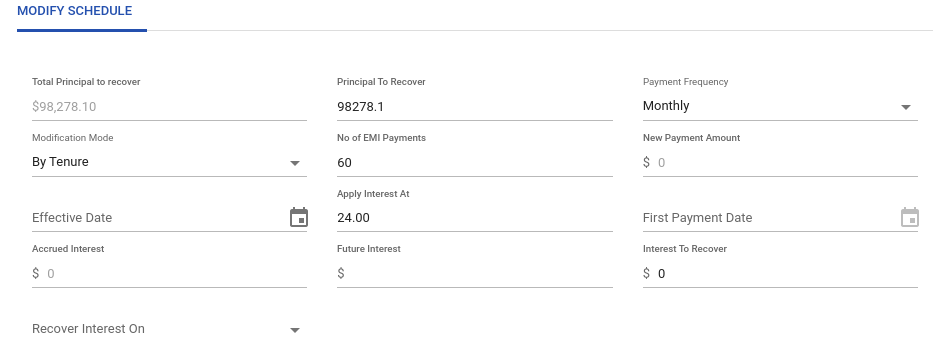
The outstanding details are shown in the “Outstanding” section at the top.
Total Principal to recover: This is total principal outstanding at the time of performing modification. This cannot be edited.
Principal to recover: This is the Principal that the lender wishes to recover. This can be less than or equal to the “Total Principal to Recover'' field. If it’s less, the remaining amount is waived off and a waive-off transaction entry is passed.
Payment Frequency: The lender can change the frequency of payments using this.
Modification Mode: By Tenure or By Payment Amount. This allows the user to change either the payment amount of the loan or the tenure of the loan. If the user selects “By Tenure”, then “No of EMI Payments” field will have to be entered and “New Payment Amount” will be auto-calculated. If the user selects “By Payment Amount”, then “New Payment Amount” will have to be entered and “No of EMI Payments” will be auto-calculated.
Effective Date: The new modified schedule will be effective from this date and start accruing interest at the updated rate and on the Principal to recover. The user can back-date loan modification as well by passing an Effective Date as a past date.
First Payment Date: The first due date of the modified schedule.
Apply Interest At: The lender can enter any rate on which it wants the new schedule to be built. This can be different from the rate that the loan was originally onboarded with.
Accrued Interest: Unpaid interest till As of Date.
Future Interest: Interest accrued from As of date till Effective Date. In case of backdated loan mod, there will be no Future Interest.
Interest to Recover: Unpaid accrued interest from the current “As of Date” to the “Effective Date”. This is also the total of Accrued Interest and Future Interest. The user can edit this and lower the amount as well. If it is reduced, then the remaining amount is waived off and a waive-off transaction entry is passed.
Recover Interest On: This option provides a dropdown of values configured for you which would tell you how the Interest to Recover would be adjusted in the new schedule.
Notes:
- The modified schedule is automatically activated on the Effective Date.
- In case of a backdated loan mod, the modified schedule is immediately activated on approving the schedule. Also, From Effective Date till As of Date accrual will be re-run and Interest billing and Reverse Interest billing entry for the same will be posted in Transactions after modification.
- A new schedule version is created on the Payment Schedule tab.
- Modification/Collections top tab on the loan view page is also updated.
- Payments are paused/resumed as per the below
- Paused On: Date of modification
- Resumed On: Effective date + processing days(only business days)
- Older unpaid/partially paid schedules are NOT carried forward to the new/modified schedule.
- DPD and current outstanding information/overdue is reset to 0 since the outstanding amount is already considered for recovery.
UI Validations
| Field Name | Validation/Restriction | Configurable per tenant/Product |
|---|---|---|
| Start Date/End Date | Min Check(if Fee Type = Scheduled) As of Date + 2+ Payment Processing Day | Product |
Charge Off Loan
Charge-off is subject to reviewer/approver mechanism by default unless configured differently for a tenant. Once approved by the manager using the sub-process mechanism, a new action called “Charge Off Loan” is available in the action menu.
The Charge Off Loan option gives users the ability to charge off a loan completely.
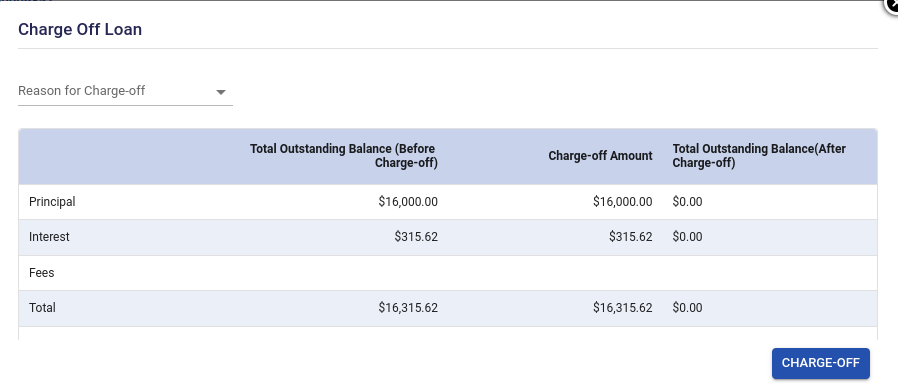
Steps:
- The Total Outstanding Balance column shows the outstanding balance for each of the buckets. The Charge-off Amount column will be the same as Total Outstanding Balance column since the system will allow to completely charge off the balances. Therefore, the amounts in the last column will always be 0.
- Click on the Charge-Off button and the system will completely charge off the loan amount.
Post-Charge Off Fee Handling
Some lenders may choose to charge a fee for the additional costs(legal, servicing, administrative etc) that would have incurred during the collection process post charge-off. For this reason, LendFoundry LMS has a provision for applying a Post-Charge Off Fee, a fee that is applicable after a loan has been Charged Off.
How to apply Post-Charge Off Fee:
Users can apply this fee via the Action Menu on any Charged Off loan. This triggers a system transaction and updates recovery balances accordingly.
Steps:
- Navigate to the Charged Off Loan
- Click on the Action Menu
- Select: “Apply Post Charge Off Fee” feature
- Fill in:
- Apply Date – Date the fee is applied. This is a future date.
- Fee Amount
- User Remarks (optional)